Friday, November 4, 2016

Perfect Autumn Day

Fall is my absolute favorite time of year, so we try and pack in as much fall fun as we can!  Here is a layout showcasing a beautiful day spent at the park.
I used Doodlebug's "Flea Market" collection for this layout.  I instantly fell in love with the cute little fox, so I knew he would have to be on this page.  I used my silhouette Cameo and some of Doodlebug's new cut files to create the scene and to cut all the leaves and flowers that border the pictures.

I like to try and document the date and location somewhere on my layouts.  For this page, I decided to incorporate some of the colors used in the leaves/flowers and added rub-ons on the coordinating papers.  And even though I am deathly afraid of mice, I decided he was too cute to not add to this section.
 Thanks for visiting!

Sunday, October 23, 2016

Too Cute to be Spooky

 For Halloween 2015, my sweet little Norah dressed up as Tinkerbell.  I, for one, think she is the cutest Tinkerbell that ever existed!!  Here is a layout that I created using Doodlebug's October 31st collection.  I always love all the cute critters from the icon sticker sheet, so I wanted to use a lot of them on this layout.  For my title, I used one of Doodlebug's new cut files that I cut using my Silhouette.   Can't even begin to say how excited I am that Doodlebug is now offering cut files!!!
Once I had all the critters arranged in the circle around my photo, I thought that there was a little too much open space.  I decided to hand stitch the spider web behind the photo.  I like how this little addition really helped to fill in the dead space.
I used some of the "All Mixed Up" rub-ons to document the year and to record who she dressed up as (in case I wouldn't remember in 20 years!!).
Halloween is always one of my favorite things to scrap.  I really love how this page turned out!

Saturday, September 24, 2016

Soakin' Up Summer

Last summer, I rented a little cabana at one of our area water parks to celebrate my sister's birthday.  All the kids had an absolute blast splashing around all day.  Here is the layout I created to showcase all the fun we had!!

 I used Doodlebug's Sunkissed collection to complete this layout.  I just love the Mr. Sunshine embellishments so I knew I wanted to include them on my page.  I decided to make my own sun and rays to fill the top of my page, using my Silhouette Cameo.  Once I had it all placed, I decided it needed a little more sparkle.  To fix that problem, I added some yellow sequins in various shades of yellow.  I secured the sequins down with some small beads that I had leftover from an old project.  I was really excited how the sequins and beads added exactly the sparkle I was looking for.


 To add a touch more sparkle to the bottom of my page, I decided to add some flowers with sequins and beads to the corners of my title section.


Sunday, September 18, 2016

Bushels of Fun

Every fall, we go to the apple orchard to pick apples.  Last year we ended up going a little too late in the season, so we weren't able to pick any apples.  That didn't stop us from having "Bushels of Fun"!

For this layout, I was inspired by the apple paper.  I thought it was a little too busy for my background paper, so I decided to use it as a coordinating piece.  I cut all the apples and baskets from my Silhouette Cameo.  I also used the Cameo to cut my title.

I thought the larger apples blended into the background, so I decided to add some faux stitching to make it pop.

Monday, August 29, 2016

Under The Sea - 2nd birthday

Today is my daughter Norah's 2nd birthday.  We celebrated yesterday with an "Under The Sea" birthday party.  I spent a lot of time creating the decorations for the party.

 Here is a picture of the birthday girl.  My mom made this adorable mermaid shirt to match the party décor.  I absolutely love how it turned out!
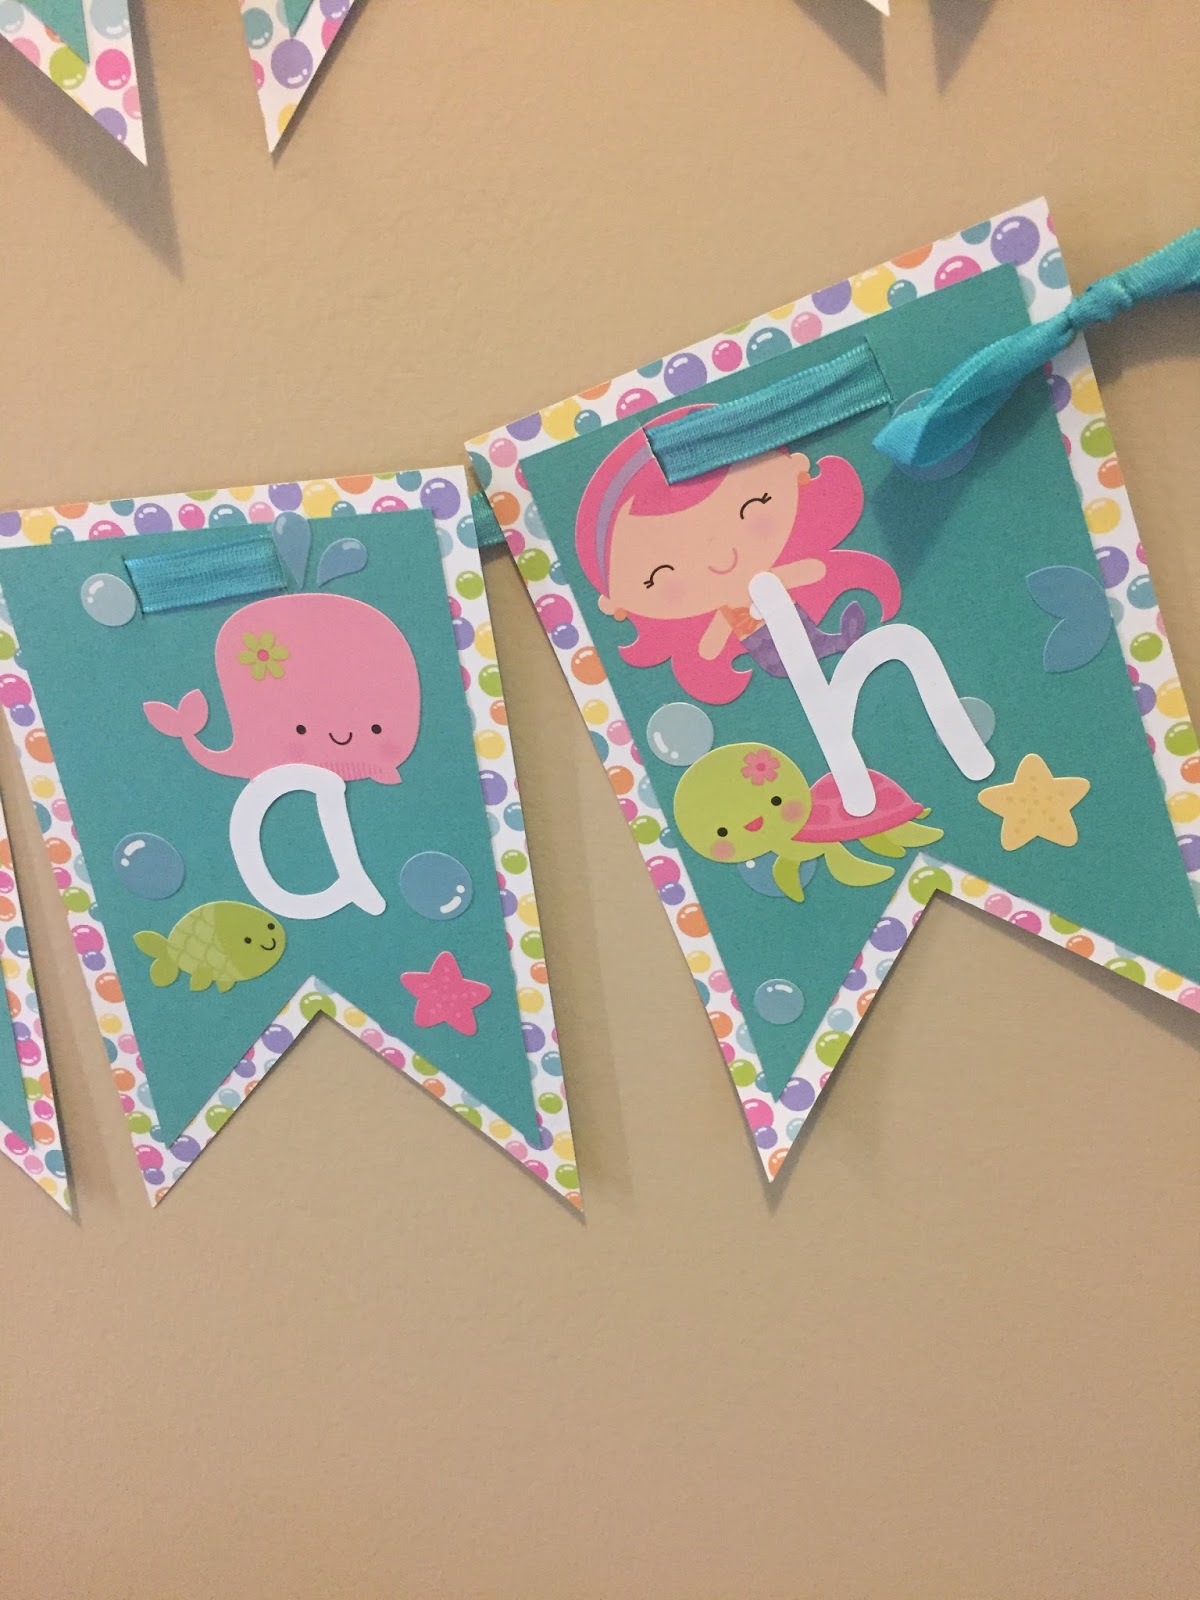
 Here is the birthday banner that I created.  I used my Silhouette to cut the banner pieces.  I used the "Under The Sea" collection from Doodlebug.  It took quite a few icon sticker sheets to create the decorations.  I instantly fell in love with the colorful bubble paper so I used it for the background of the banner pieces.
Here are a few close-ups.

I also made the thank you cards that we will be sending to all our party guests.
I also made a welcome wreath to hang on the door to welcome our guests. 
I used tulle to create the wreath and then added the banner pieces using a piece of rope.

I am really happy with how everything turned out.  I had also made a sign for the gift table but forgot to take a picture with the craziness of the day.  I hate when that happens!

Saturday, August 20, 2016

Birthday Cupcakes

I took the cutest pictures of my nieces and nephews enjoying their birthday cupcakes at my daughter's 1st birthday party.  I knew I had to do a cute layout to showcase their cuteness.   I, of course, had to add a picture of the aftermath of Norah with her smash cake.  For this layout, I used a combination of several Doodlebug collections.  The background paper is from the Sugar & Spice collection and the other papers are from the Sugar Shoppe collection.
 I did some hand stitching across the banner to tie it all together.  Here is a close-up.
This layout was inspired from a sketch that I found on Pinterest.  I stuck pretty closely to the original design but made a few small modifications.  Here is the original sketch.

Sunday, August 14, 2016